Thursday, April 14, 2016

"Or Do Without..."

Use it up
wear it out
make it do
or do without.

This phrase was coined during the great depression, and as a kid, I often heard it in my own home. Many of us have retained this little tidbit of advice in the back of our heads, but think it doesn't apply to us during this era of prosperity. However... there's a vital bit to this phrase that I think we're all forgetting...

"Or do without."

In helping families de-clutter their homes, I've found that many of us have a fear of the future. We save small bottles of shampoo for vacations. We save electronic cords in case we find an antiquated electronic that needs it. Why do we do this to ourselves?

I believe the heart of this saying is not in abusing our possessions, or holding on to things that have no use for because we might need it in the future. I think this phrase means something much kinder.
Use it up: Don't be wasteful

How often do we throw out rotten leftovers? It's easy to give in to the urge of replacing what we already have before it has been used up. I think we could all take a lesson from Great-Grandpa and find a use for what we already have. I love the current DIY re-purposing craze because it brings us back to the heart of resourcefulness. We feel thrifty, imaginative... There are lots of reasons to feel good about this advice.

Wear it out: Let possessions serve their purpose.

Do you still have clothing in your closet with the tags on it? Why? Are you saving it for a special occasion? Do you have lotion that you haven't used since your last date? Why not pamper yourself when no one's around? We often save things for special occasions, but why not enjoy what we own now? It can brighten up a dismal day. It can spice up a lackluster room. You are allowed to love your items year round.


Make it do: Use the things you already have.

Do you find yourself buying clothing when you already have sufficient for your needs? People often own twice as many clothes as they actually wear. When we have this much stuff floating around, it causes clutter and stress. You'll find you can be much happier with "just enough", than with an excess. When you detox your closet and keep only things you truly love, you'll find it makes a difference when you go shopping. You'll be less compulsive, and aware of what truly makes you happy.

Or do without: Simplify your life by removing things you don't need.

There is a particular group of people that I find have more stuff packed into their closets and spilling out on their floors than most... I like to call them Provisioners.

"I might needs this when..."
"If it floods, I'll be glad I have this..."
"When my daughter comes back from college she'll want..."

Hardcore Provisioners refuse to throw things away based on fear. It is hard to get them to de-clutter because it's a literal leap of faith for them. They can't trust that they'll be fine without something if the time ever comes. But when they begin to let go, they are the most liberated. 

Disclaimer: I believe in provisioning to an extent. We are not talking about food storage, we're talking about clothing, backup items in case the first breaks, dusty closets smashed full of unused pillows... 

Conclusion:

People in the depression learned a new way of life. A level of resourcefulness and thrift. Many of us live on the opposite side of that pendulum. We are surrounded by plenty. It is time for us to learn a new way of maintenance. We can literally drown in our surplus if we aren't careful. Maybe take a step back from your home and think about how this phrase can apply to you. Happy tidying!

Rachel

Friday, November 20, 2015

Surviving Nanowrimo Without Caffeine


I'm not a coffee drinker. In fact, I don't do caffeine often. Last year however, when I read a Nanowrimo motivational essay, the first bulletpoint for success was:


DRINK LOTS OF COFFEE!

I laughed, but once I got in the thick of Nanowrimo madness, I realized that a caffiene rush could help propel my productivity. So, I began the tradition of starting each writing session with a mug of Stephens hot chocolate.

It was lovely.

I looked forward on those cold November mornings to my mug and keyboard. I can see how people get attached to such a calming moment with themselves. I finished my 50,000 words in just twenty two days of writing. It was incredible! 

Here is my proud first print of my novel! 
 

But this year, I don't have hot chocolate. I'm halfway through Nanowrimo, dreading every moment I sit down to my keyboard because I have no idea how to crush that many crappy words out of my brain. It is much, much harder without caffeine.

But I've learned a few things. Ways to dig deeper, and let go so I can accomplish my goals regardless of how hard the day is. First:


1. Take a moment to inspire yourself.

Meditation. Connecting with Nature. Praying. There are so many ways you can feed your soul. Writing is often a spiritual experience for me and I like to involve God in the process. I begin with a prayer, then spend a moment of mediation- not thinking about my book, but thinking about what I believe in. What matters to me. More often than not, those themes find a way into my writing and make it more genuine, complex and enjoyable.

2. Never hit delete.

I read somewhere that you can't create and critique at the same time. I love that sentiment. Critique allows for second guessing and backtracking, the two sure killers of momentum. Let your fingers run away with your keyboard. Let them spell out exactly what your mind is thinking, without worrying about sentence structure, consistancy, grammar, etc. You'll find that though you'll make mistakes, your words will be vibrant, raw, and impulsive. Your draft may be riddled with cliche's or plot holes, but those are things that can be fixed. Just finish the scene. You'll have an emotional guidepost to build onto till you have a perfect picture.

3. Don't expect a final draft.

Have you ever seen an animated film storyboard? The pictures drawn out are sloppy, often colorless, but when you pair them next to the finished product, they are unmistakably the same scene. The storyboard captures the emotion and direction the storytellers wanted to portray. When you are writing for nanowrimo, you are writing the storyboard. You are in no way completing a finished product. Don't stress yourself out by telling yourself that it is.

4. Get a support group.

I have an amazing, wonderful, lifesaving critique group called Writing Through Brambles that adopted me last year. They live two states away, but continue to let me skype in to meetings and read their work via Googledocs. All six of us are Wrimo's this year, and so for our most recent session, we did a skype write in. Most of our time was spent in silence, typing madly on our keyboards, but there was something about the sound of us all typing that made me feel so supported. Like I could actually follow through and do this! Every time I see their updates on facebook I am motivated and reminded that if I want to win, I should go get writing.

Now, time for me to get back to writing my novel. Cheers!

-Rachel

Monday, November 4, 2013

Chicken and Orzo Soup


     Fall is here, and one of the things I miss most about home are the bright yellows, oranges and greens of the trees. Some of my favorite memories are of walking through BYU campus, thousands of brightly colored leaves lining the sidewalks. This soup brings me a little closer to home. It is absolutely beautiful. All the colors of the vegetables really make this soup pop visually. The chicken and pasta together are hearty, and the thyme and corn add a little bit of sweetness. So if you're in the mood to make this season a little more nostalgic, this soup is a great way to do it. 
     This recipe is fast, and stands great on it's own. So, put away your sour cream and cheese, because this honestly tastes better without it. Also, if you have never used Orzo pasta before, you are in for a treat. It is small, and shaped like a grain of rice, so you can have a hearty "noodle soup" taste without the mess that comes along with longer noodles.
 
Recipe:
1 tsp. Oil
2/3 C. Diced Carrots
1/2 C. Diced Celery
1/2 C. Diced Onion
1/4 tsp. Salt
1/8 tsp. Pepper 
1/2 tsp. Thyme
1/2 tsp. Parsley
2 Breasts Diced Chicken (About 2/3 lb.)
4 C. Chicken Broth
1 C. Water
1/2 C. Uncooked Orzo Pasta
1 C. Corn
2-3 C. Baby Spinach
1 T. Lemon Juice

Step 1: Dice your vegetables and chicken. 
(*Tip: I have found this soup is easier to eat if the ingredients are similar sizes. Try to avoid having large chunks of chicken, medium sized slices of celery mixed in with all the naturally smaller bits. Keeping everything small also helps to evenly distribute the flavors, so every bite is balanced.)

Step 2: Heat the oil in a pan (I prefer olive oil) and saute the vegetables with the spices.

 Step 3: Add chicken. 
(*Tip: If you are using raw chicken, you can saute it at the same time as the vegetables. It helps cut down on dishes if you do everything in the same pot. Personally, I like to use a rotisserie chicken, because it has a better texture, and adds a little more flavor.)
 Step 4: Add broth, water, orzo and corn.
 Step 5: Bring to a boil and then let simmer for 20 minutes.

Step 6: Just before serving, add the baby spinach and lemon juice. Let it cook just enough to wilt the spinach leaves.

Step 7: Serve and enjoy!
(*Tip: A little trick I learned while serving soup. If you fill the ladle up 2/3 full, then double dip the ladle, the surface tension of the soup will pull any drips off the bottom. This prevents you from dripping across your table, or counter as you fill up your bowls! Amazing huh!)

Monday, October 14, 2013

Personalized T-Shirt

I have wanted to make personalized T-shirts for a while now. My good friend Mighty and I got together to make them, and OH MY GOODNESS!!! They were so cute! It was so much easier than I thought it would be.

Supplies
pattern
iron on interfacing
iron on adhesive
fabric
embroidery floss
shirt

Step 1: Print out your template. I used a font named "Archistico". You can find the free font download here.
Tip* Depending on the size of your shirt, you will want to adjust the size of your font. Once you print it, hold it up against your shirt to make sure it's the right size.


Step 2: Trace the lettering onto your interfacing.
Tip* I used an iron on non-woven interfacing. The thinner, the better.

Step 3: Iron your interfacing on to a scrap of fabric.
Step 4: Cut out your letters.
Step 5: Iron your letters onto an iron on adhesive strip. Here is an example of what to buy. Iron on adhesive.
You can tell my spacial reasoning skills aren't all that great. I thought it would come out correct, but nope. It's backwards. Peel off the paper backing and you can stretch the adhesive off from around the letters.
Step 6: Prepare your T-shirt. Remove stickers, tags, etc...
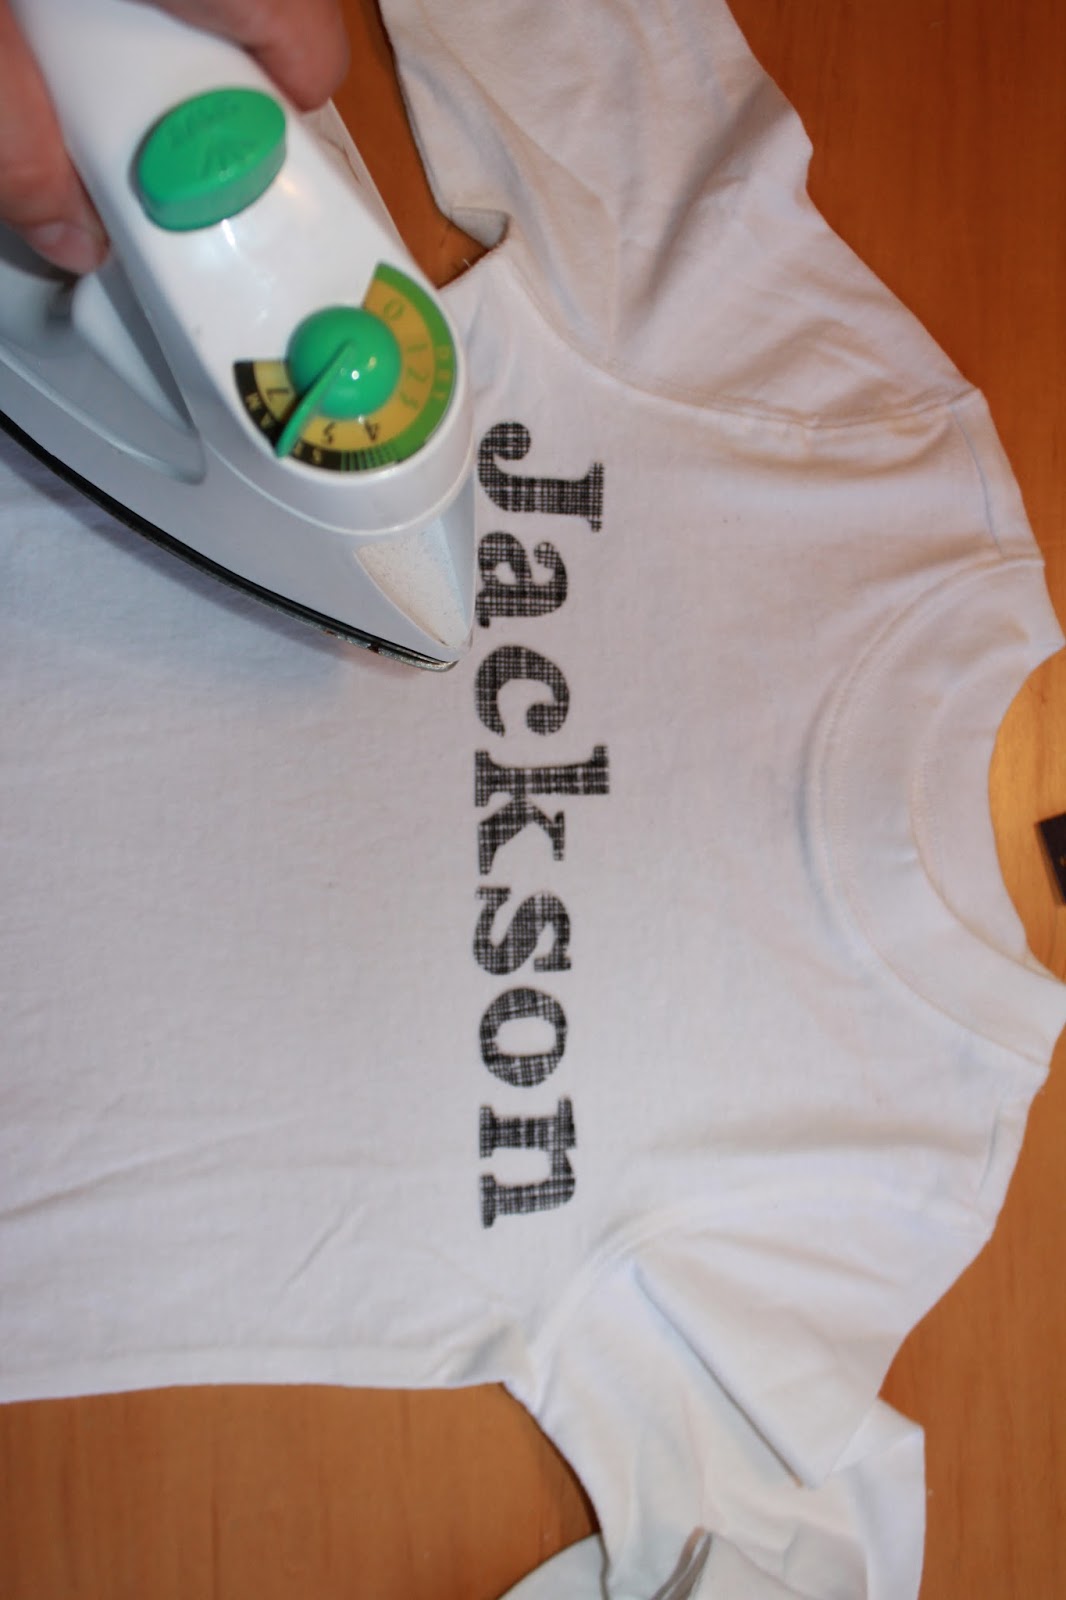
Step 7: Place your letters in the desired spot on your shirt, then iron them on.
Here is what my shirts looked like at this point. They look cute, but the adhesive won't stay permanently so you'll have to do a little bit of hand stitching at this point to anchor them on.
Step 8: Using embroidery thread that matches your fabric, tie a double square knot at the end of your thread.
Step 9: Begin on the outer edge of the first letter and pull your thread through about 1/8th of an inch away from the edge. Just enough to catch the fabric, with a little extra showing on the outside.


Monday, September 30, 2013

Water storage- How much water do I need?

      Every year, My church organizes a "Provident Living Expo". It's an event meant to help families in my area prepare for emergencies. Three years ago, I was asked to put together a booth on water storage.
     At the time, there were several wildfires sweeping through the area, cutting off freeway travel and burning down homes. To top it off, the state was also in a severe drought. In fact it was so bad that Governor Rick Perry organized a statewide fast to pray for rain. I'll admit, people were a little more concerned about water storage then.
     I put together a pamphlet covering all the basics on water storage and passed it out at my booth. I guess I did an okay job because I've been asked to run the same booth for three years in a row. As the expo just came to a close this year, I thought "Hey! This would be a great blog series." So, if you're looking for where to begin when it comes to water storage, you're in the right place. And don't worry--- I'll keep it simple! First up...

How much water do I need?
The red cross recommends that you store 2 weeks worth of water for your family.

You'll need 1 gallon of water per day, per person.
So, to figure out how much you need, here is a handy dandy family worksheet! Print it out, and stick it somewhere to remind you to get it done!


One gallon per person will be enough for drinking and food preparation.  

If you want water for personal hygiene purposes or pets, you'll need to add additional storage. (You can cut down on water needs by storing baby wipes. That way you can give yourself sponge baths instead of having to store large amounts of water.)

One of the most important things about water storage is, if supplies run low, never ration water.  Drink the amount you need today, and try to find more for tomorrow.  Minimize the amount of water your body needs by reducing activity and staying cool.

I hope this motivates you to get started in your emergency preparedness. Just take it one step at a time, and before you know it, you'll be ready for whatever may come!

Monday, September 16, 2013

Sportsmanship for 3 year olds...

     Lately it seems like my life has revolved around Candy Land, Go Fish, and Connect Four. Little L has a little competitive streak that makes me laugh, unless I win, which means I'll be dealing with a meltdown. For a while, I thought it would be easier to let him win consistently. Tantrum avoided + game enjoyed = success. This was an okay idea until he started to play games when his friends came over. The instant he realized he didn't win, he lost it. That's when I realized that I  had been missing out on teaching opportunities by always letting him be the winner. Not to mention he had an inflated sense of how good he was. I decided it was time to stop being so easy on him.

    I don't mean that I'm going to crush him every time we play. (I know that sounds pretty confident on my part, but face it, Mommy vs. 3 year old... It's pretty obvious who's going to win.) So, here are some strategies I've discovered to help me continue to have fun with my toddler, while giving him the opportunity to be a better sportsman.

Here are some ideas:

1. Give your child a head start. Everyone will have more fun if you are trying your hardest to win. If you are racing, let them start closer to the finish line. If you are playing Go Fish, give them a target amount of matches, and give yourself a higher target. Get creative!

2. Celebrate winning, without making other players feel inferior. I hate winning against sore losers. It totally detracts from my victory. Success story: Picture this; me and 2 three year olds battling it out on Candy Land. L's friend was totally dominating the game and his face grew more and more desperate, full of hope that he would pull some last minute maneuver and take the victory. I was more worked up than him, wondering how I could avoid the inevitable meltdown at the end of the game and not downplay the victory for his friend. The inevitable victory happened and, before L could react I shouted "You made it! Hurray! Now everyone run to the castle! We have to make it to his party!" The friend was excited that the party was in honor of him, and L felt like he got to participate in the rewards of the victory. Which ultimately, isn't that why we all play games? To enjoy ourselves?

3. Show children how to recognize their strong points, even if they lose. Children soak in compliments like a paper towel. If you continually compliment them on achievements during the games, it's easy to reiterate them at the end of the game, and take the focus away from the loss, and focus more on the accomplishments. "I can't believe you tricked my queen like that! That was so clever!" or even "Wow, you are getting so much better at this!"

4. Model good behavior. Offer continuous praise throughout the game to other players. Show that you can have fun without having to be the best.

5. Role Play it up! A little bit of acting can go a long way and be an effective way to prove a point. If you have an older child or adult playing with you, you can show them Exhibit A: vs. Exhibit B. Ask them which friend they would like to play with, the sore loser or the congratulatory friend.


Monday, September 9, 2013

Felt Food Tutorial: Pizza Crust

Have you ever noticed how much kids love to bite play food? Occasionally, I'll see a little girl politely pretend to nibble, but my boys are a whole other story. Often their vivacious gnawing leaves me wondering why they can't be so enthusiastic over dinner?
We've tried plastic food, but it only takes a few minutes before it is peppered in permanent teethmarks. For some reason, my kids don't find the food as appealing after that... I was frustrated with this when I discovered FELT FOOD! What a great idea! It's easy to wash, keeps it shape, and most importantly it's incredibly cheap to make! I have thoroughly enjoyed making felt food, so I thought I would include tutorials for some of my favorite pieces.


Pizza Crust Tutorial

Step 1: Cut out two circle shapes out of felt. One eight inch in diameter, and one 6 1/2 inch in diameter.
Step 2: Cut each of your circles into quarters.

Step 3: Set aside your 8 inch circle quarters, this will be the bottom of your pizza crust. Using your 6 1/2 inch circle as a guide, cut a 2 inch strip of felt. These two pieces will be the top of your pizza.

By now you should have an assortment of pieces that look like this.

 Step 4: Sew the rounded edge of the large triangular shape to the rounded outside edge of the crust. 
(I used dark colored thread so you could see what I was doing, but I suggest using a matching thread that you won't be able to see so easily. Or, if you like the crafty look of the hand stitching, I would suggest using an embroidery floss.)

I used a blanket stitch, because it allows for better shaping.


Here is another view of what it will look like.
 Step 5: Attach the small triangular shape to the crust. This time, the seam will be on the underside of the felt. This will give it the right shape once you put everything together.


 Step 6: Cut out a piece of felt that is just a bit smaller than the base piece and insert it into the crust. This will give it a little bit of density, and make it more firm.
(I used blue for contrast, but only for tutorial purposes. Try to use a similar color for your filling, because anything this dark will show through and make your felt look tinged wrong.)
 Step 7: Cut out gradient pieces of felt for the crust. About 3 should do.
 Step 8: Fold down the top of the crust and fit snugly onto the filling.
 Step 9: Begin hemming along the thin part of the crust, working from the crust and going in towards the point. This will prevent it from bubbling up.
 Step 10: Once you have made it to the point, continue up the other side until you get to the crust again.
 Step 11: Next, do a basic stitch to hold down the center of the pizza crust to keep things from shifting.
Here is a view of what it will look like on the bottom.
Once you get to the end, here is a little trick: take your needle, and thread it into the middle of your fabric...


Poke out the point about an inch into the fabric, and pull it all the way through.
You will have a tail of thread coming randomly out of your crust.
Now snip the thread and it will disappear into the center of your crust. That way, you don't have any tail ends poking outside of your piece of pizza!
Step 12: Cut two shapes to fit the ends of your crust.
Step 13: Blanket stitch around the ends and tuck the threads in, using the little trick I showed you.
And here it is! Your finished product!